
3D-Printed Retro Computer Builds for Mac Mini M4 | Series 4
By Doxmini Team
What if the Mac mini wasn't just a computer — but the computer?
From Puck to PC
Every print we've covered so far — the creative cases in Series 1, the practical accessories in Series 2, the multi-machine racks in Series 3 — treats the Mac mini as what Apple designed it to be: a headless box that connects to your existing peripherals.
But some makers looked at that tiny aluminum puck and saw something else entirely. They saw the guts of a complete computer, just waiting for the right shell.
These builders aren't just printing enclosures. They're engineering full systems — integrating screens, speakers, keyboards, and power routing into 3D-printed chassis that transform the Mac mini into a self-contained machine. The results are part nostalgia, part engineering marvel, and entirely functional.
1. Retro PC Case "Mac Mini One" -- A Full Desktop Computer from Scratch

Designer: casatift Vibe: "Build a whole computer, not just a case."
This is the most ambitious build in the entire series. casatift didn't just design an enclosure — they engineered a complete retro-styled desktop computer around the Mac mini. We're talking integrated display, card reader, power button mechanism, and a form factor that looks like it belongs on a desk in 1998.
The build uses a disassembled Microsoft Surface Go screen as the integrated display, a UGREEN card reader mounted in a front bay, and — here's the clever part — a mechanical camera shutter cable routed through the case to press the Mac mini's bottom power button from the front panel. It's the kind of analog hack that makes you smile.
What goes into the build:
- Disassembled Surface Go screen as the integrated display panel
- Mechanical camera shutter cable routed to press the power button from the front — pure analog ingenuity
- UGREEN card reader mounted in a front-panel bay
- PD charger powers the screen independently
- Keychron Q4Pro keyboard matches the retro aesthetic perfectly
- 48.4 hours of total print time across 5 plates — this is a commitment
- 935 boosts and a dedicated community modifying the design for different screens
The community has been active with modifications. Users have adapted the design for portable monitors instead of the Surface Go, and one maker is working on integrating an iPad Air screen. The STEP files are available for custom modifications.
This isn't a weekend project — it's a statement piece. But when you're done, you have a fully self-contained retro desktop that happens to run macOS on Apple Silicon.
2. eMac Mini Enclosure -- The G4 eMac Lives Again
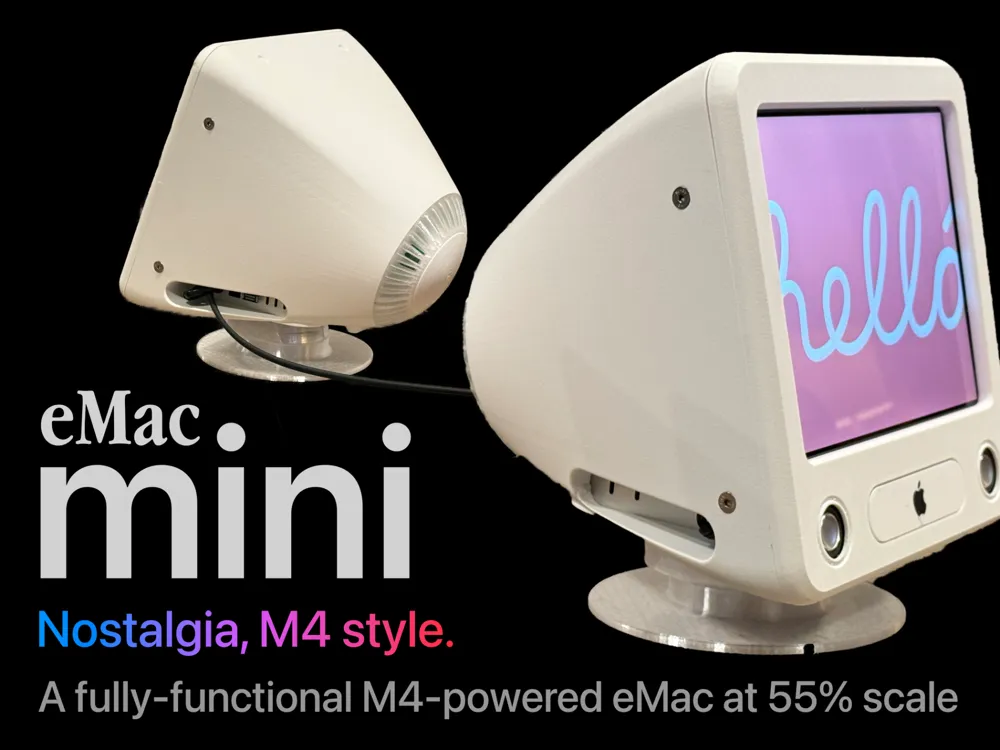
Designer: Jerrod H (@Jerrodh) Vibe: "The eMac, reimagined for Apple Silicon."
If you've been following this series, you'll recognize Jerrod H — the designer behind the Mac Mini Pro enclosure in Series 1 and the Rack Pro Set in Series 3. The man doesn't miss, and this might be his masterpiece.
The eMac Mini is a 55-60% scale replica of Apple's 2002 G4 eMac — the education-focused all-in-one that was beloved in schools and labs. But this isn't just a decorative shell. It's a fully functional all-in-one computer with a real display, working speakers, and a tilt-and-swivel stand.
The engineering is remarkable:
- 9.7" 2048x1536 IPS iPad panel with a VSDisplay HDMI controller board — the same resolution density as a Retina display
- BetterDisplay app configured for HiDPI 1024x768 @ 2x rendering — sharp text and UI at the small screen size
- Working speakers powered by a Class D amplifier — actual audio output, not just decoration
- Functional tilt and swivel stand — adjusts just like the original eMac
- Single power cable — all internal power routing means one cable powers everything
- CD slot cover attached with magnets, cleverly hiding the LCD control buttons behind it
- Printed in Bambu ABS-GF (structural parts) and clear PETG (display bezel area)
Jerrod designed every detail with intent. The proportions are carefully scaled so the Mac mini's ports remain accessible from the back. The speaker grilles are functional, not decorative. The stand mechanism actually tilts and swivels with the right tension. And the single-cable power solution means your desk stays clean.
This is the kind of build that makes people stop and stare. It looks like Apple made it — which is the highest compliment a 3D print can receive.
3. Mac Mini & iPad Mini Macintosh -- The Original Mac, Reborn
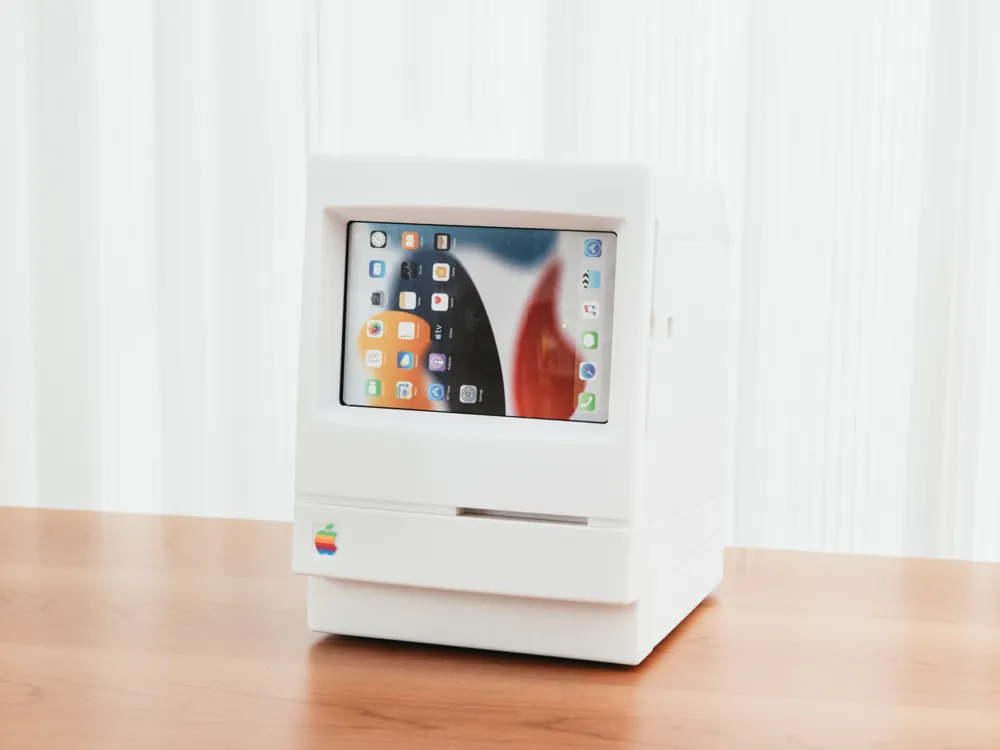
Designer: user_1494615610 Vibe: "The Macintosh 128K called. It wants its look back."
Where the eMac Mini goes full engineering, this build goes full charm. It's a retro Macintosh-styled enclosure that uses an iPad mini as the display — meaning you don't need to source specialty panels or HDMI controller boards. Just slide your iPad mini into the front and connect a USB-C cable.
The iPad mini 6 or 7 sits in the screen opening, powered directly from the Mac mini's front USB-C port through a cable routed inside the case. The result is a miniature classic Macintosh that's genuinely functional as a display — albeit through Sidecar or Universal Control rather than a direct video connection.
What makes it accessible:
- iPad mini 6 or 7 as the display — no disassembly, no specialty parts, no soldering
- USB-C pass-through routes power from Mac mini's front port to the iPad through the case body
- Toggle power switch based on a lever mechanism — press from outside, it actuates the Mac mini's bottom button
- Storage box at the rear holds up to 4 external SSDs plus miscellaneous items — nothing wasted
- Supports both M4 and M1 Mac mini — includes a replacement base plate (plate 9) for M1 dimensions
- Dowel pin assembly with metal rods (2.5mm recommended) — sturdy and repairable
- 3-4 walls, 15-20% infill for a solid, lasting build
- 19 comments of active community discussion
This is the most approachable build in the roundup. You don't need to source specialty display panels or amplifier boards. If you have a Mac mini and an iPad mini, you already have everything you need for the electronics. The 3D print handles the rest.
It's also just... delightful to look at. There's something deeply satisfying about seeing that iconic Macintosh silhouette on your desk, knowing it's running an M4 chip inside.
4. JVC 3100R Retro Design -- A 1970s Portable TV for the M4 Era
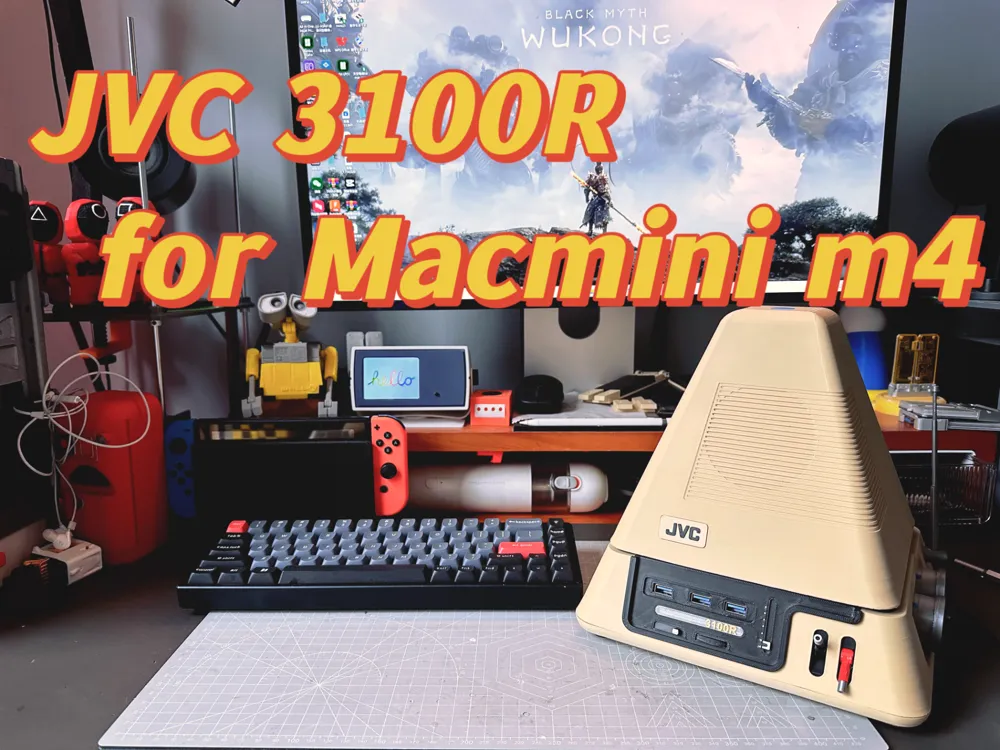
Designer: xiao long bao (@xiaolongbao) Vibe: "1977 called. It wants its TV back."
The JVC 3100R was an iconic portable television from 1977 — a chunky, space-age design with a tiny CRT screen, dual knobs, and a handle on top. It's become a design classic, and xiao long bao has faithfully recreated it as a functional Mac mini enclosure with a 7.9-inch 2K display where the CRT used to be.
This is the most visually striking build in the roundup. The multi-color printing captures the original's desert yellow body, black accents, and silver details. The dual knobs on the front aren't just decorative — they're a Bluetooth multimedia controller that actually works for volume and playback control.
What goes into the build:
- 7.9-inch 2K display mounted behind the screen opening — sharp and bright at this size
- Bluetooth multimedia controller with dual knobs — functional volume and media controls that match the original TV's aesthetic
- USB hub integrated into the chassis for expanded connectivity
- Slotted damping hinges (0.3NM) — smooth, controlled movement for any adjustable panels
- 31.4 hours of print time across 15 plates — a serious multi-day print project
- Multi-color filament: Bambu Lab Matte Desert Yellow, Carbon Black, Red, Silver, Blue, Transparent, Gold PLA plus Black TPU
- Heat-set inserts (M3 and M2) plus various cap head and flat head screws for solid assembly
- Detailed materials PDF included with the download
Important printing notes: The designer warns about warping risk on large-area parts due to uneven bed heating at edges. Circular tabs and skirts are built into the models to help, but spray adhesive is strongly recommended. This is a build that rewards patience and careful bed prep.
The result is a conversation piece that doubles as a fully functional computer. Set it on your desk and watch people do a double-take when they realize it's running macOS.
Choosing Your Build
| Build | Display | Difficulty | Print Time | Key Feature |
|---|---|---|---|---|
| Retro PC | Surface Go (disassembled) | Hard | 48.4h | Full desktop with card reader |
| eMac Mini | 9.7" iPad panel + HDMI board | Hard | Variable | Working speakers & swivel stand |
| iPad Mini Macintosh | iPad mini 6/7 (no disassembly) | Easy | Variable | No specialty parts needed |
| JVC 3100R | 7.9" 2K display | Medium | 31.4h | Bluetooth knobs & multi-color retro style |
My recommendation:
- Want the easiest build? The iPad Mini Macintosh needs zero specialty electronics — just your Mac mini, an iPad mini, and the printed parts.
- Want the most impressive result? The eMac Mini is a jaw-dropper. Functional speakers, tilt-and-swivel stand, and that iconic eMac silhouette.
- Want a full retro desktop experience? The Retro PC case is the most complete system — integrated display, card reader, and a mechanical power button.
- Want a showpiece? The JVC 3100R is pure retro eye candy — multi-color printing and working Bluetooth knobs make it a desk conversation starter.
Build Tips for All-in-One Enclosures
Building a complete computer enclosure is different from printing a simple stand or case. Here's what to keep in mind:
- Use ABS or PETG — these enclosures trap heat from both the Mac mini and the display electronics. PLA will warp. ABS-GF (glass-filled) is ideal for structural parts.
- Plan your cable routing — measure and test-fit cables before final assembly. USB-C and HDMI cables have minimum bend radii that you need to respect.
- Test electronics before enclosing — connect your display panel, speakers, and power to the Mac mini on a desk first. Debug any issues before they're inside a printed shell.
- Consider thermals — add ventilation holes if the design allows, or monitor temperatures during extended use. Active cooling is worth considering for sustained workloads.
- Print structural parts with more walls — 3-4 walls and 15-20% infill is the minimum for parts that support a display panel or handle daily tilting/swiveling.
- Buy quality connectors — cheap USB-C cables and HDMI adapters cause most of the "it doesn't work" complaints in the comments. Use cables from reputable brands.
The Series So Far
- Series 1: Fun & Creative Cases and Stands — Mac Mini Pro enclosure, Mars Rover stand, and more
- Series 2: Popular & Useful Accessories — Under-desk mounts, power button solutions, ventilated stands
- Series 3: Multi-Mac-Mini Stacking & Rack Solutions — Miniature server racks, chainable stands, modular frames
- Series 4 (this post) — Retro all-in-one computer builds
All models featured are free to download for personal use. Always check individual model licenses before commercial use. Links and stats were verified at time of writing.
Building one of these retro machines? We'd love to see your build — share your photos in the comments!